Are you looking to build strong, toned biceps without needing heavy weights or a gym membership? Resistance bands might be just what you need! These stretchy bands are not only affordable and portable but also incredibly effective for working out your biceps.
In this article, we’ll explore everything you need to know about resistance band bicep workouts. From understanding the basics of resistance bands to learning the best exercises and routines, we’ve got you covered. Whether you’re a beginner or an experienced fitness fan, you’ll find valuable tips and techniques to help you achieve your fitness goals.
Anatomy of the Biceps
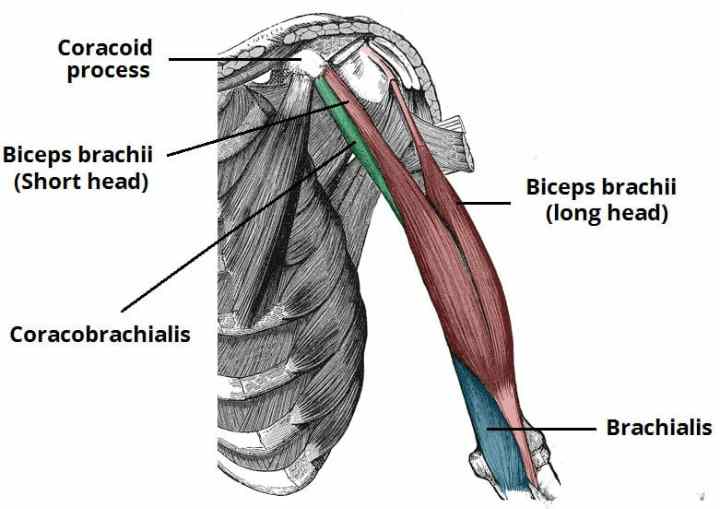
The biceps brachii, commonly known as the biceps, is a large muscle located in the upper arm. Its primary function is to facilitate the movement of the elbow and shoulder joints, especially flexion and supination of the forearm. The name “biceps” refers to the muscle’s two heads: the long head and the short head, which originate from different parts of the shoulder blade (scapula) and merge to form a single muscle belly that attaches to the forearm.
The long head of the biceps originates from the supraglenoid tubercle of the scapula, running through the shoulder joint and down the arm. It sits on the lateral side of the biceps and plays a key role in stabilizing the shoulder joint. The short head arises from the coracoid process of the scapula and runs parallel to the long head but stays closer to the body. Both heads converge into a single tendon that inserts into the radial tuberosity of the forearm, enabling the biceps to control the movement of the radius.
Best Exercises for Long Head Triceps
The primary function of the biceps is elbow flexion, which allows the forearm to be lifted toward the body, as well as forearm supination, which rotates the palm upward. In addition to these key functions, the biceps also assist in shoulder stabilization and flexion, particularly when lifting or carrying objects. However, the biceps are not the only muscles responsible for elbow flexion—muscles like the brachialis and brachioradialis also contribute to this movement.
SHOP FOR THE RESISTANCE BAND SET ON AMAZON
The biceps muscle plays a crucial role in everyday movements, from simple tasks like picking up objects to complex actions such as throwing or pulling. Understanding the anatomy of the biceps is essential for those looking to target this muscle through strength training, ensuring proper technique to maximize its function and prevent injury.
12 Effective Resistance Band Bicep Workouts
Here are effective resistance band bicep workouts to help you build strong, sculpted biceps using resistance bands:
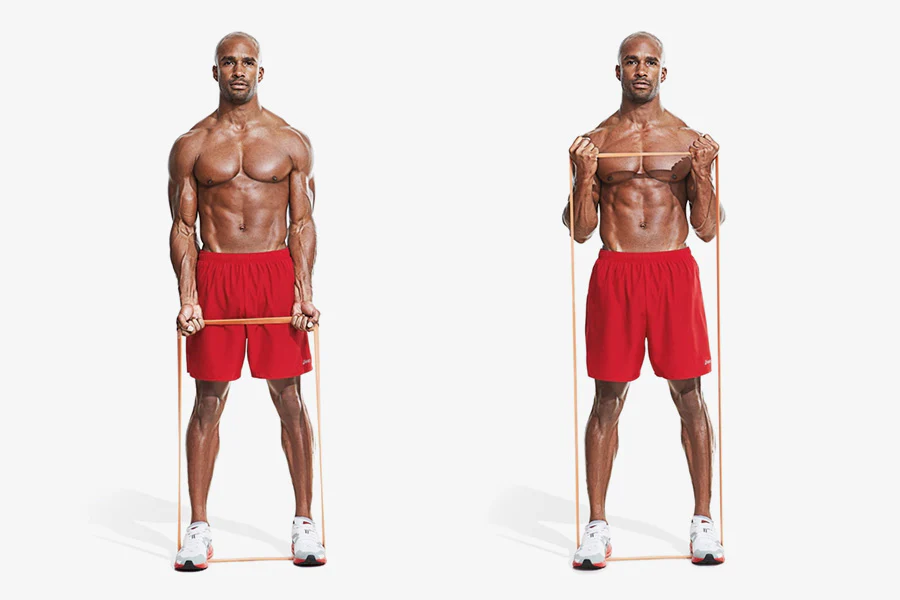
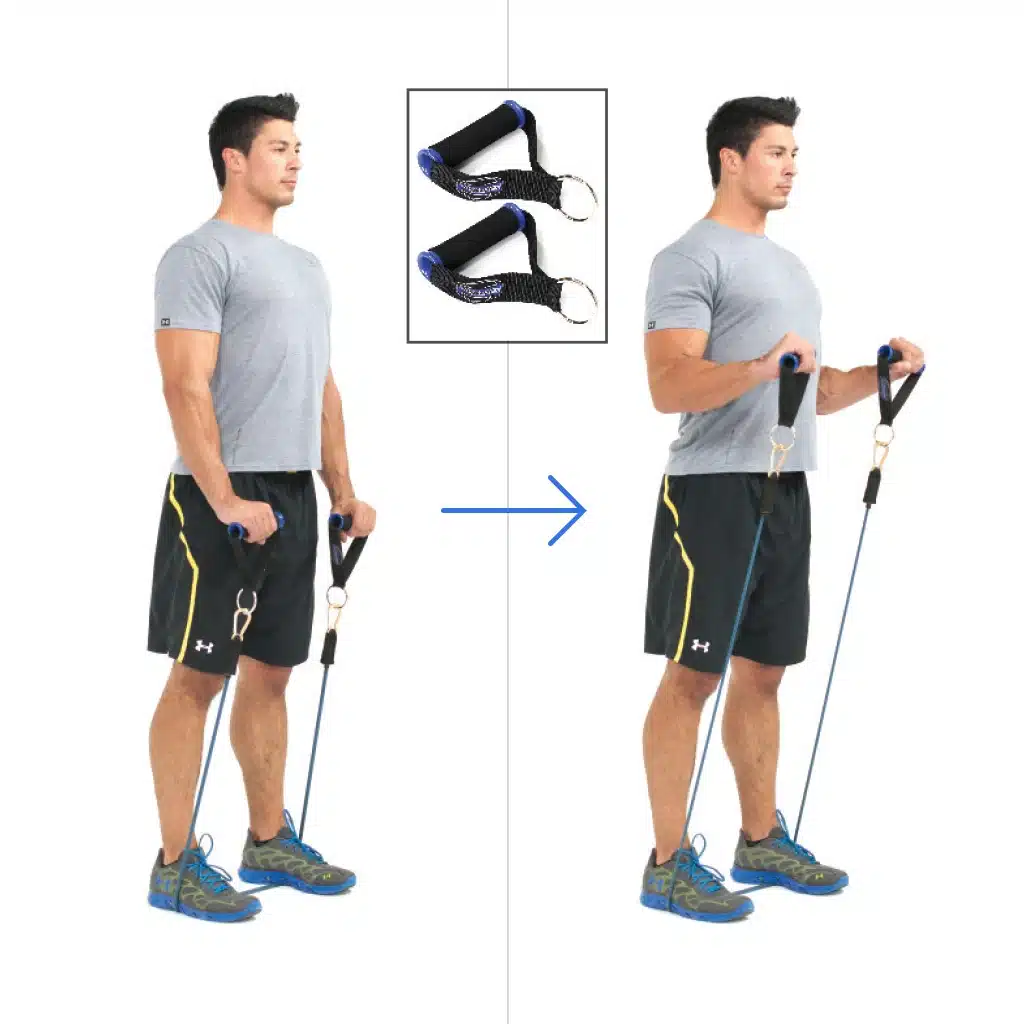
1. Standing Bicep Curls

- Targeted Muscles: Biceps brachii (both long and short heads), brachialis, and brachioradialis.
- Sets and Reps: 3-4 sets of 10-15 reps.
How to Do It:
- Stand on the resistance band with feet shoulder-width apart.
- Hold the handles with an underhand grip (palms facing up).
- Keep your elbows close to your torso and curl the handles towards your shoulders.
- Squeeze your biceps at the top, then slowly lower back to the starting position.
Tips:
- Keep your back straight and avoid swinging your body.
- Focus on a slow, controlled movement to maximize muscle engagement.
- Ensure your elbows stay stationary throughout the exercise.
2. Hammer Curls
- Targeted Muscles: Brachialis, brachioradialis, and biceps brachii.
- Sets and Reps: 3-4 sets of 10-15 reps.
How to Do It:
- Stand on the resistance band with feet shoulder-width apart.
- Hold the handles with a neutral grip (palms facing each other).
- Curl the handles towards your shoulders while keeping your elbows close to your body.
- Squeeze at the top, then slowly lower back to the starting position.
Tips:
- Maintain a neutral wrist position to target the brachialis and brachioradialis effectively.
- Avoid using momentum; keep the movement controlled.
- Keep your upper arms stationary to isolate the biceps.
3. Reverse Grip Curls
- Targeted Muscles: Brachioradialis, brachialis, and biceps brachii.
- Sets and Reps: 3-4 sets of 10-15 reps.
How to Do It:
- Stand on the resistance band with feet shoulder-width apart.
- Hold the handles with an overhand grip (palms facing down).
- Curl the handles towards your shoulders while keeping your elbows close to your body.
- Squeeze at the top, then slowly lower back to the starting position.
Tips:
- Focus on keeping your wrists straight to avoid strain.
- Perform the movement slowly to maximize forearm engagement.
- Keep your elbows stationary to ensure proper form.
4. Wide Grip Curls
- Targeted Muscles: Biceps brachii (emphasis on the short head), brachialis, and brachioradialis.
- Sets and Reps: 3-4 sets of 10-15 reps.
How to Do It:
- Stand on the resistance band with feet shoulder-width apart.
- Hold the handles with a wider-than-shoulder-width grip, palms facing up.
- Curl the handles towards your shoulders while keeping your elbows close to your body.
- Squeeze at the top, then slowly lower back to the starting position.
Tips:
- Ensure your grip is wide enough to target the short head of the biceps.
- Keep your back straight and avoid swinging your body.
- Focus on a slow, controlled movement to maximize muscle engagement.
5. Concentration Curls

- Targeted Muscles: Biceps brachii (primarily the short head).
- Sets and Reps: 3-4 sets of 10-15 reps per arm.
How to Do It:
- Sit on a bench and place the resistance band under your foot.
- Hold the handle with one hand and rest your elbow on the inside of your thigh.
- Curl the handle towards your shoulder, squeezing your bicep at the top.
- Slowly lower back to the starting position.
Tips:
- Focus on isolating the bicep by keeping your upper arm stationary.
- Perform the movement slowly to maximize muscle engagement.
- Avoid using your body to lift the weight; let your bicep do the work.
6. Drag Curls
- Targeted Muscles: Biceps brachii (emphasis on the long head), brachialis, and brachioradialis.
- Sets and Reps: 3-4 sets of 8-12 reps.
How to Do It:
- Stand with your feet shoulder-width apart and hold the resistance band with an underhand grip.
- Keep the band close to your body and drag your elbows back as you curl the band upwards.
- Continue to drag the band up until it reaches chest height.
- Slowly lower the band back to the starting position.
Tips:
- Focus on keeping your elbows back to isolate the biceps.
- Avoid using your shoulders to lift the band.
- Perform the movement slowly to maximize muscle engagement.
7. Bayesian Curls
- Targeted Muscles: Biceps brachii, brachialis, and brachioradialis.
- Sets and Reps: 3-4 sets of 8-12 reps.
How to Do It:
- Anchor the resistance band behind you at a low point.
- Step forward to create tension in the band and hold the handle with an underhand grip.
- Curl the handle towards your shoulder while keeping your upper arm stationary.
- Squeeze your bicep at the top, then slowly lower back to the starting position.
Tips:
- Ensure constant tension in the band throughout the movement.
- Keep your elbow fixed to isolate the biceps.
- Perform the exercise slowly to maximize muscle engagement.
SHOP FOR THE RESISTANCE BAND SET ON AMAZON
8. Band-Assisted Chin-Ups
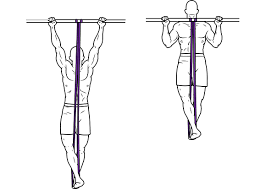
- Targeted Muscles: Biceps brachii, latissimus dorsi, trapezius, rhomboids, and forearms.
- Sets and Reps: 3-4 sets of 6-10 reps.
How to Do It:
- Loop the resistance band over a pull-up bar and place your knees or feet in the band.
- Grip the bar with your palms facing you (underhand grip).
- Pull your body up towards the bar until your chin is above it.
- Slowly lower yourself back to the starting position.
Tips:
- Engage your core to stabilize your body.
- Avoid swinging or using momentum to pull yourself up.
- Focus on using your biceps and back muscles to lift your body.
9. Crossbody Hammer Curls
- Targeted Muscles: Brachialis, brachioradialis, and biceps brachii.
- Sets and Reps: 3-4 sets of 10-15 reps per arm.
How to Do It:
- Stand with your feet shoulder-width apart and hold the resistance band with a neutral grip (palms facing each other).
- Curl the handle across your body towards the opposite shoulder.
- Squeeze your bicep at the top, then slowly lower back to the starting position.
- Repeat with the other arm.
Tips:
- Keep your elbows close to your body to isolate the biceps.
- Perform the movement slowly to maximize muscle engagement.
- Avoid using momentum to lift the band.
10. Preacher Curls

- Targeted Muscles: Biceps brachii (emphasis on the short head), brachialis, and brachioradialis.
- Sets and Reps: 3-4 sets of 8-12 reps.
How to Do It:
- Sit on a bench and place the resistance band under your foot.
- Rest your upper arm on the preacher bench or your thigh.
- Curl the handle towards your shoulder, squeezing your bicep at the top.
- Slowly lower back to the starting position.
Tips:
- Ensure your upper arm remains stationary to isolate the biceps.
- Perform the movement slowly to maximize muscle engagement.
- Avoid using your body to lift the band.
11. Inward Curls
Lower Body Pull Exercises for Strength
- Targeted Muscles: Biceps brachii, brachialis, and brachioradialis.
- Sets and Reps: 3-4 sets of 10-15 reps.
How to Do It:
- Stand with your feet shoulder-width apart and hold the resistance band with a neutral grip.
- Curl the handles inward towards your chest.
- Squeeze your biceps at the top, then slowly lower back to the starting position.
Tips:
- Keep your elbows close to your body to isolate the biceps.
- Perform the movement slowly to maximize muscle engagement.
- Avoid using momentum to lift the band.
12. No Money Curls
- Targeted Muscles: Biceps brachii (emphasis on the short head), brachialis, brachioradialis, and infraspinatus.
- Sets and Reps: 3-4 sets of 8-12 reps.
How to Do It:
- Stand with your feet shoulder-width apart and hold the resistance band with an underhand grip.
- Rotate your elbows inward and curl the handles out to the sides.
- Squeeze your biceps at the top, then slowly lower back to the starting position.
Tips:
- Focus on rotating your wrists to maximize the contraction.
- Keep your elbows stationary to isolate the biceps.
- Perform the movement slowly to maximize muscle engagement.
Arnold Press vs. Lateral Raise
These exercises will help you build strong, well-defined biceps using resistance bands. Remember to maintain proper form and gradually increase resistance to continue making progress.
Benefits of Using Resistance Bands for Bicep Workouts
Using resistance bands for your bicep workouts comes with several advantages. Here are some key benefits:
- Versatility: Resistance bands can be used in various ways to target different parts of your biceps. You can perform a wide range of exercises, making your workouts more dynamic and interesting.
- Portability: One of the best things about resistance bands is that they are lightweight and easy to carry. You can take them anywhere, whether you’re traveling or just want to work out at home.
- Cost-Effective: Resistance bands are generally more affordable than other types of workout equipment. You don’t need to invest in expensive gym memberships or heavy weights to get a good bicep workout.
- Joint-Friendly: Resistance bands provide a smooth and controlled resistance, which is easier on your joints compared to lifting heavy weights. This makes them a great option for people with joint issues or those recovering from injuries.
- Improved Muscle Activation: Resistance bands can help you achieve better muscle activation. Their constant tension ensures that your muscles are engaged throughout the entire range of motion, leading to more effective workouts.
- Progressive Resistance: With resistance bands, you can easily adjust the level of resistance by using bands of different thicknesses or by changing the length of the band. This allows you to progressively increase the difficulty of your workouts as you get stronger.
- Safety: Resistance bands are generally safer to use than free weights. There’s less risk of dropping a heavy weight on yourself, and you can easily control the resistance to match your strength level.
- Variety: Resistance bands can be used to perform a variety of exercises that target not only your biceps but also other muscle groups. This helps in creating a balanced workout routine.
Post-Workout Carbs and Muscle Loss
By incorporating resistance bands into your bicep workouts, you can enjoy these benefits and achieve your fitness goals more effectively.
Advanced Techniques and Variations
Once you’ve mastered the basic resistance band bicep workouts, you can take your workouts to the next level with these advanced techniques and variations:
1. Supersets and Circuits
- Supersets: Combine two bicep exercises back-to-back without rest. For example, perform a set of bicep curls followed immediately by a set of hammer curls. This increases the intensity and keeps your muscles engaged.
- Circuits: Create a circuit of multiple exercises targeting different parts of your biceps and other muscle groups. Move from one exercise to the next with minimal rest to keep your heart rate up and maximize calorie burn.
2. Progressive Overload
- Increase Resistance: Gradually increase the resistance by using thicker bands or doubling up bands. This ensures your muscles continue to be challenged and grow stronger.
- Change Band Length: Shorten the length of the band to increase tension. For example, stand on the band with a wider stance or wrap it around your hands to make it shorter.
3. Tempo Training
- Slow Reps: Slow down the tempo of your reps to increase time under tension. For example, take 3-4 seconds to lift the band and 3-4 seconds to lower it. This enhances muscle activation and endurance.
- Pause Reps: Add a pause at the peak contraction point of the exercise. For instance, hold the band at the top of a bicep curl for 2-3 seconds before lowering it.
4. Eccentric Training
- Focus on the eccentric (lowering) phase of the exercise. For example, lift the band quickly and then take 4-5 seconds to lower it. This helps in building muscle strength and size.
5. Combining with Other Equipment
- Dumbbells: Use resistance bands in conjunction with dumbbells for added resistance. For example, perform bicep curls with a dumbbell in one hand and a resistance band in the other.
- Stability Ball: Incorporate a stability ball to engage your core while performing bicep exercises. For example, sit on the ball while doing bicep curls to improve balance and stability.
6. Isometric Holds
- Hold the band in a fixed position for a set amount of time. For example, hold the band at the midpoint of a bicep curl for 10-15 seconds. This increases muscle endurance and strength.
7. Drop Sets
- Perform a set of bicep curls to failure, then immediately switch to a lighter resistance band and continue the exercise until failure again. This technique helps in maximizing muscle fatigue and growth.
By incorporating these advanced techniques and variations into your resistance band bicep workouts, you can keep your routine challenging and effective.

SHOP FOR THE QUALITY RESISTANCE BAND SET
FAQs
Q 1. Can resistance bands build muscle as effectively as free weights?
Ans. Yes, resistance bands can be just as effective as free weights for building muscle. They provide constant tension and variable resistance, which can help stimulate muscle growth.
Q 2. How do I choose the right resistance band for bicep workouts?
Ans. Start with a band that allows you to complete your desired number of reps with good form. As you get stronger, you can progress to thicker bands with more resistance.
Q 3. How often should I do resistance band bicep workouts?
Ans. Aim to train your biceps 2-3 times per week, allowing for rest days in between to let your muscles recover and grow.
Q 4. Can I combine resistance band exercises with other types of workouts?
Ans. Absolutely! Resistance bands can complement other forms of exercise, such as weightlifting, bodyweight exercises, and cardio routines.
Q 5. What should I do if my resistance band snaps during a workout?
Ans. If a band snaps, stop using it immediately to avoid injury. Inspect your bands regularly for signs of wear and replace them as needed. Always follow the manufacturer’s guidelines for safe use.
Q 6. How can I prevent my resistance bands from slipping during exercises?
Ans. Ensure that the bands are securely anchored and that you have a firm grip. You can also use bands with handles or loops to improve stability.
Q 7. Can resistance bands help with muscle imbalances?
Ans. Yes, resistance bands are excellent for addressing muscle imbalances. They allow for unilateral exercises, which can help strengthen weaker muscles and improve overall balance.
Q 8. How long should each resistance band workout session be?
Ans. A typical resistance band workout session can last anywhere from 20 to 45 minutes, depending on the number of exercises and sets you include.
Q 9. Do I need any additional equipment for resistance band bicep workouts?
Ans. While resistance bands alone are sufficient, having a door anchor or a sturdy object to secure the bands can enhance your workout options.
Conclusion
Resistance bands are a fantastic tool for building strong, toned biceps without needing heavy weights or a gym membership. They offer constant tension, variable resistance, and are easy to use anywhere. By incorporating a variety of exercises like standing curls, hammer curls, and concentration curls, you can effectively target all parts of your biceps.
Remember to maintain proper form, gradually increase resistance, and stay consistent with your workouts. Focus on the mind-muscle connection, control the lowering phase of each exercise, and ensure you warm up and cool down properly. Good hydration, nutrition, and adequate rest are also key to maximizing your results.

Good day, and welcome to Fitthour. My name is Shubham Vijay, and I am a certified personal trainer and nutrition coach with 6 years of experience in the fitness industry. At Fitthour, we specialize in types of training, such as strength training, cardio, or HIIT, and our mission is to help clients achieve their fitness goals and improve their overall health.